|
PC INTERFACE MANUAL |
CE-3
CHRONOGRAPH
Version
1.01
Attention Microsoft Windows users!
You need to upgrade Windows HyperTerminal
in order to access some Windows keys
The upgrade is free from
http://www.hilgraeve.com/htpe/download.html
How to Install CE-3 Software
see page 54
Printable manuals and software
are
available from
http://www.echrony.com
©Copyright eChrony inc. 2004/2005
CE–3 Main Features
· 2 Modes of operation: simple CE mode and an advanced CF mode
■
CE mode is an easy to use single-key
operation. It is fully automatic.
Just turn the unit on and wait for Auto-Calibration to complete. When
your
work is done, turn the unit off and your data is saved automatically
in the
memory. This mode does not use eDisk for permanent data storage.
■ CF mode is 75+ functions, menu driven
mode and it uses eDisk.
This is an advanced mode with full control over the unit.
· Flip between CE & CF mode by pressing <MENU+ENTER> keys.
· Sensitivity level control increases accuracy whenever possible.
· Adaptive Calibration detects environment interference.
· Super Archery mode for very sharp arrows & very small objects.
· CE-3 has a 40 shot volatile memory divided into 4 to 10 Strings.
·
CE-3 has a small eDisk
drive for 400 shots.
eDisk holds data without battery
for up to 40 years.
eDisk is divided into 10 folders with 40 shots each.
· Data protection option, eDisk On-Off, available from CAM mode.
· In CF mode, data is automatically Saved-Retrieved to-from eDisk.
· Remote Control via PC Interface using plain ASCII readable text.
Baud rates 300 to 4800 b/s, 3-wire cable, maximum 200 feet long.
Operating System Independent Interface - RS232 TTY Terminal mode.
Import data to any Spreadsheet or Data base with ASCII format.
Macros provided for Microsoft Excel data import & some stats.
· Elapsed time between shots transmitted to the PC: +/- 0.001 sec.
· Download data to PC; String, Folder or an entire eDisk.
· Alarms for low battery, missed or bad shots, memory full etc.
· Ambient Temperature is recorded with each shot.
· Velocity and Temperature are synchronized at all times.
·
View Statistics in Real
time as you shoot. Available Stats are
Low, High, Average, Extreme spread,
Standard Deviation,
Percent STD, Power Factor, Energy.
· View Cross String Statistics by scrolling from string to string.
· Change Units on the fly from Stats or Data mode.
· Select USA or METRIC system with One Time Conversion view.
· Bullet mass entry, 0.005 to 40.950 gm or 0.077 to 631.95 grains
· Power factor in grain-f/s or grams-m/s, Energy in joules
· Scroll up and down, Shot to Shot, in Data or Stats mode.
· Scroll left and right, String to String, in Data or Stats mode.
· Scroll forward and backward from Folder to Folder.
· Delete Shot & Undelete Shot.
· Delete String, Undelete String & Old Data restore.
· Delete Folder & Undelete Folder.
· Auto Power down, select from 00:01 to 03:50 HH:MM or None.
· Real time Ambient Temperature display in Celsius or Fahrenheit
· Real time Battery Voltage display for internal load conditions.
· For PC interface see Remote Control Examples below.
|
Appendix |
Remote Control Examples |
Page |
|
A1 |
36 |
|
|
A2 |
37 |
|
|
A3 |
38 |
|
|
A4 |
38 |
|
|
A5 |
39 |
|
|
A6 |
39 |
|
|
A7 |
40 |
|
|
A8 |
44 |
|
|
A9 |
45 |
|
|
45 |
||
|
46 |
||
|
46 |
||
|
47 |
||
|
48 |
||
|
49 |
||
|
A16 |
50 |
|
Warning Before you use this product, you must follow all safety instructions as recommended by manufacturer of your firing device, no matter what that device may be. Irrespective of who the manufacturer of your firing device may be, you alone are ultimately responsible for using correct safety precautions. You should not use this product to get combustion pressure for your firearm.
This product is a passive optical instrument. It does not emit any microwave radiation in order to measure projectile velocities.
It is your sole
responsibility to safeguard yourself and other people against any injury or
property damage when firing projectiles near the unit or accidentally into
the unit. You must not use this product to determine firearm combustion
pressure. |
Table of contents
Sensitivity Control & Muzzle Blast
Turning off sensors and alarms
Change Battery without losing data
Flashing colon or flashing decimal points
Saving Data on eDisk is not necessary with PC
Quick steps to import eDisk Memory Data
Quick steps to import live captured data
Basic features of the CE-3 PC interface
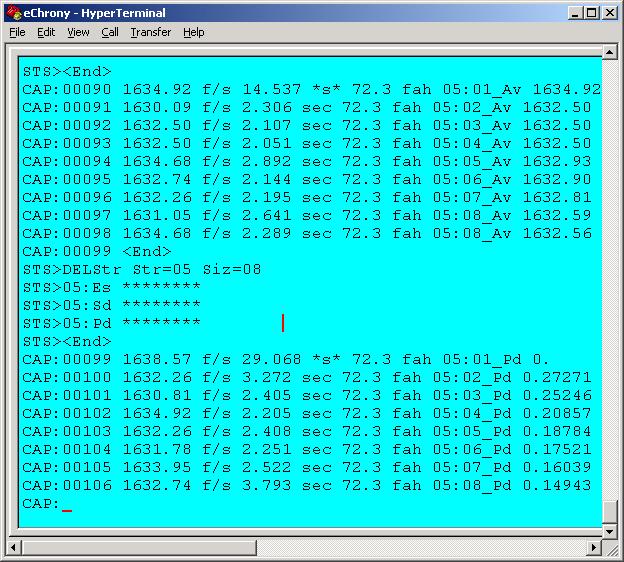
Clear String & Set Stats example
Example of CE-3 downloading data
Control keys for CE-3 chronograph
"I" Increase sensor sensitivity
"K" Turns temperature Log sent to PC On/Off
"L" Turns Stats Monitor Log sent to PC On/Off
"O" Decrease Sensor Sensitivity
"P" Turns the unit Off without saving.
"U" Change units for selected data type
"W" Display current data location
"Y" Locate Min or Max position in the string
"9" Turn the unit Off and saves folder.
"Ctrl-B" Un-delete deleted folder
"Enter" Enter key same as <ENTER> key
"Backspace" Un-delete deleted shot
"Alt-Delete" Delete current string
"Alt-Backspace" Un-delete deleted string
"PgUp" Move to the next folder
"PgDn" Move to the previous folder
"Right Arrow" Move to the next string
"Left Arrow" Move to the previous string
"Up Arrow" Move to the next shot or stats
"Down Arrow" Move to the previous shot or stats
A1. OS Independent PC Interface
A7. Import Data to Spreadsheet
A11. Archery, Fast fire & Sensitivity
A12. Query Chronograph Status & Setup
A13. Download String, Folder or Entire eDisk
A14. Move between Shots, Strings & Folders
Files in the archive eChrony.exe
Software Installation information
Sensitivity Control & Muzzle
Blast
Sensitivity level may be reduced to lower the effect of muzzle blast and other noise. The range may be set from 00% to 95% in steps of 5% for CE-3 and 1% for CF-3. Lowering sensitivity reduces muzzle blast effect. Unfortunately, lowering sensitivity also reduces accuracy. For muzzle blast reduction, it is better to move the unit farther back rather than reducing sensitivity. For loud firearm use 50%; Archery, Paintball and other quiet devices use 80%. Higher values, 85% and up, require low Electromagnetic & Optical interference, only found in the countryside.
Turning off sensors and alarms
Special function has been provided that turns off detection electronics to save battery power and stop environment alarms. The key sequence to do this is <MENU+UNITS>. Use this feature when only data and statistics review are needed. To activate velocity measurement again, you must calibrate the unit. From CE mode, turn the unit Off and On. If you fail to calibrate it, the unit will stop detecting shots. To check whether sensors are turned Off, press <MENU> key which activates pending warning and alarms.
Change Battery without losing data
Turn the unit Off for about 5 seconds. While the unit is Off you must not touch any of the keys. The system will stay alive in hibernation, without battery at room temperature, from 4 to 20 minutes. You have about 4 minutes to replace the old battery with a new one. If the battery is reversed, you do not lose data or damage the unit or the battery. The battery must still be replaced correctly within 4 minutes.
Flashing colon or flashing decimal points
Flashing colon or decimal points indicate that the unit will no longer accept shots because environment conditions have changed. You can turn sensors off and use the unit for data review only, or you can calibrate it again. Please note that the unit will not accept shots unless it is calibrated again.
Saving Data on eDisk is not necessary with PC
When Power Down command is executed with “P” key, CE-3 does not save data to eDisk when it is turned off. If you want to force data save before shutdown, then you must use “9” key command. Data saving is irrelevant when using PC because PC has a far better data storage capability. Please make sure that HyperTerminal is set to “Transfer/Capture Text”; it can log thousands of shots per session.
CE-3
stores data in volatile memory; it means that data will be lost from
it if the battery drops below 4.0 volts or it is removed.
Also, when you execute hardware reset with <STATS+DATA+MENU>
keys, data may lose order of sequence and disappear; see Data Recovery below or refer to User’s Manual
on page 43. You can save your shots onto the eDisk from CE mode by pressing
<MENU+POWER> key. This will force the
unit to save current folder to eDisk, irrespective of the mode it is in. If you
need to save your data on eDisk all the time, then you have to use CF mode
where data saving operations are automatic. CE mode is intended for
simple use, where all you need is some velocity measurements that do not have
to be stored on eDisk. Because CE mode is not using eDisk, it prevents
data clutter on it.
There is command in CF Data
menu, ![]() , that
restores all the contents found in the trash bin back to the string. This is
intended for emergency use only when, for example, shots were deleted during
sorting them out.
, that
restores all the contents found in the trash bin back to the string. This is
intended for emergency use only when, for example, shots were deleted during
sorting them out.
This command is only
available from CF mode. Switch the unit to CF mode, press <DATA>
key to get ![]() menu,
press <MENU> two times to get
menu,
press <MENU> two times to get ![]() menu, press <UNITS>
three times to get
menu, press <UNITS>
three times to get ![]() menu.
menu.
It may be necessary to delete unwanted shots, one by one, with <MENU+DATA> key function. The system cannot differentiate between bad and good shots; it restores all. The shots are restored back to memory in a correct sequence.
CE-3 provides a simple remote control interface labeled "HIP", Human Interface Protocol. All data is sent and received through RS232 port from the PC. The data sent and received is in ASCII readable form. The unit has also a proprietary Binary Interface Protocol "BIP" that is not accessible through TTY terminal.
The "HIP" RS232
interface can operate with Windows 95, 98, ME, 2000, NT, XT, Linux with TTY
programs and Macintosh with TTY programs. If your PC can emulate TTY
terminal, and, most PCs do, then you can use it for CE-3. It will even
operate with the old DOS and Windows 3.XX if you can run Telix, Crosstalk, Mirror
or TTY program.
If you are only downloading data from CE-3 for export to Excel or to print it
out, you do not need to read this entire manual. Here are the simple steps to
do this.
Quick steps to import eDisk Memory Data
|
1) |
|
Connect CE-3 to COM1 port on the PC. |
|
2) |
|
Click on eChrony.ht file - this starts HyperTerminal program. |
|
3) |
|
Click on eChrony.xls file - this starts Excel program. |
|
4) |
|
Go to eChrony HyperTerminal window. |
|
5) |
|
Type "Q" or press "space bar" - this will wake up CE-3 if not already on. |
|
6) |
|
Type "3" - this downloads entire eDisk(*) to HyperTerminal. |
|
7) |
|
Go to <Edit>, click on <Select All> |
|
8) |
|
Go to <Edit>, click on <Copy> |
|
9) |
|
Go to Excel window and press <Ctrl-Shft-M> - this is a macro |
|
|
|
for importing eDisk Memory data |
(*) eDisk: an internal, permanent data storage
for CE-3 chronograph. This is a tiny solid state disk, based on EEProm and it holds
data without the use of battery power for up to 40 years (some chip
manufacturers claim 100 years).
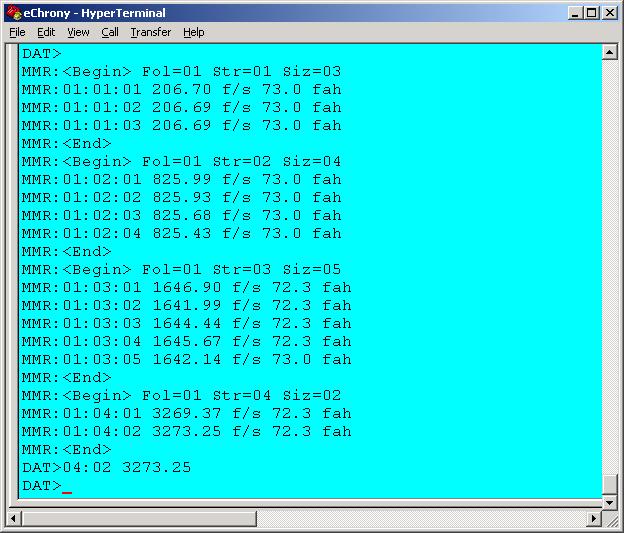
Example
of "eChrony.ht" downloaded eDisk data window
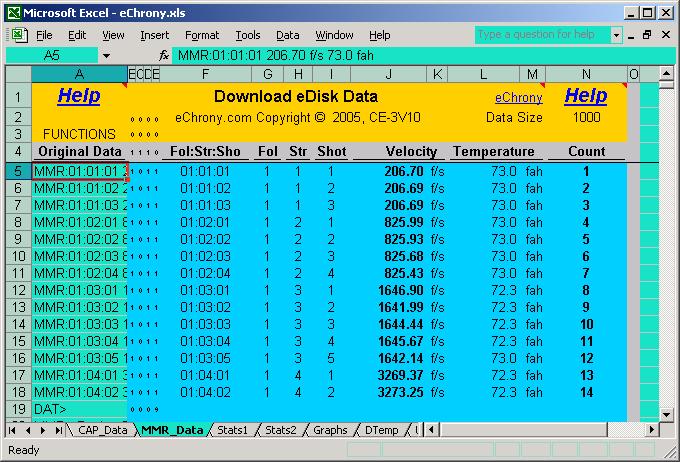
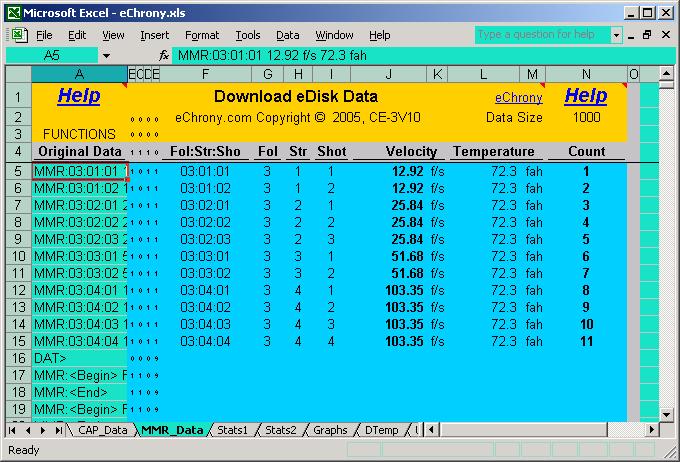
Example of "eChrony.xls" imported eDisk memory data
Quick steps to import live captured data
|
1) |
|
Connect CE-3 to COM1 port on the PC. |
|
2) |
|
Click on eChrony.ht file - this starts HyperTerminal program. |
|
3) |
|
Click on eChrony.xls file - this starts Excel program. |
|
4) |
|
Go to eChrony HyperTerminal window. |
|
5) |
|
Type "Q" or press "space bar" - this will wake up CE-3, if not already on. |
|
6) |
|
Select stats for stats monitor and fire your shots |
|
7) |
|
Go to <Edit>, click on <Select All> |
|
8) |
|
Go to <Edit>, click on <Copy> |
|
9) |
|
Go to Excel window and press <Ctrl-Shft-C> - Capture data import macro |
Example of "eChrony.ht"
captured data window
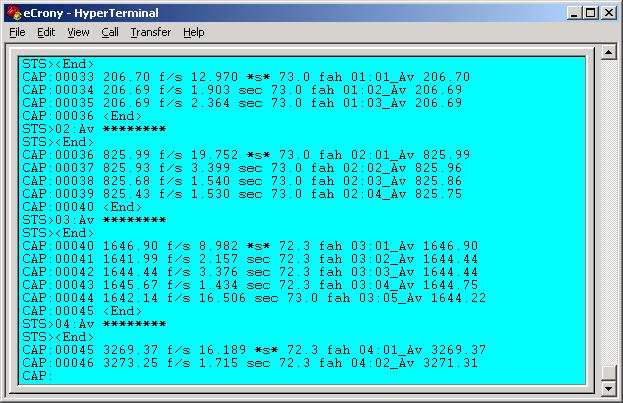
Example
of "eChrony.xls" imported captured data
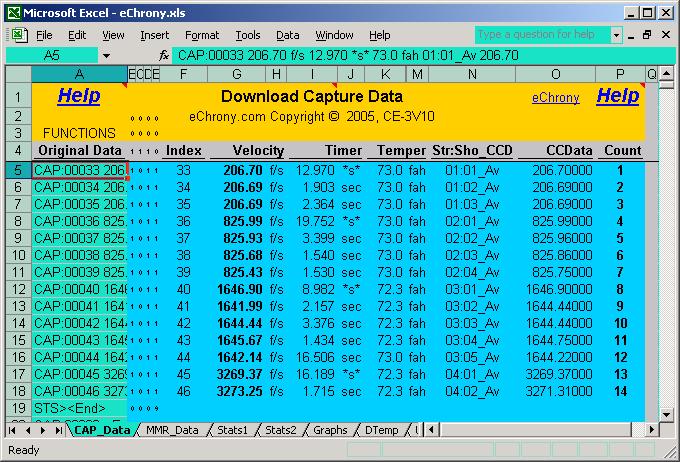
There are two shortcut keys for macros, <Ctrl-Shft-M> for importing eDisk Memory data and <Ctrl-Shft-C> for importing Capture data. These macros can also be executed from <Tools> / <Macros> <Run> of the Excel program.
We used Macros & Formulas to make it easier for the end-user; however, there are other ways to import the data. If you are familiar with Excel, you can use Excel Data Import utilities from the main menu. From <File> menu choose <Open>, specify file type as text and type your file’s name that you want you to import. From <Data> menu go to Import <External Data>, then to <Import Data>specifying file type as text. Excel will interpret CE-3 data ASCII format very easily.
Please note that
spreadsheet file "eChrony.xls"
has two Sheets:
1) "MMR_Data" for eDisk
Data Importing.
2) "CAP_Data" for
Capture Data Importing.
|
1 |
- |
Data transfer rate, 300 to 4800 Bits/Sec |
|
2 |
- |
Exports data to Excel with just a few key strokes |
|
3 |
- |
Data can be exported on the fly, anytime between shots. |
|
4 |
- |
Downloads Current String data |
|
5 |
- |
Downloads Current Folder data |
|
6 |
- |
Downloads Entire eDisk data - all Folders (CE-3 V10 has only 10 folders) |
|
7 |
- |
Records up to 65,536 shots per session into a file for later use |
|
8 |
- |
Transmits Velocity data, from 2.00 f/s to 9999.99 f/s, (or m/s) |
|
9 |
- |
Transmits Timer data, range of 8388.000 Sec, resolution +/- 0.001 Sec. |
|
10 |
- |
Transmits Ambient Temperature data, in Fahrenheit or Celsius |
|
11 |
- |
All Captured Shots are assigned Index number for Data Base Sorting |
|
12 |
- |
The unit provides full remote control from PC, including power On & Off |
|
13 |
- |
Selects what data to record, Temperature, running Stats, Tags etc. |
|
14 |
- |
Displays running stats on the last, 4, 5, 6, 8, 10, 13, 20, 40 shots |
|
15 |
- |
Stores up to 400 shots on eDisk when used without PC (*) |
|
16 |
- |
Magnified Display View when using HyperTerminal. |
(*) Please note that CE-3 has memory for
only 400 shots on eDisk.
Also, CE-3 does not store timer data on eDisk,
it only transmits it to the PC.
Higher models will be able to store timer
data and will have capacity on eDisk
for up to 12,000 shots.
Basic features of the CE-3 PC interface
CE-3 is connected to the PC through a 16 feet cable provided with the unit. Extensions for 30, 60,120 & 200 feet are sold separately. You can also use commercial audio cable extensions. The unit is controlled remotely from PC with a single key stroke operation and without the requirement for complex interface programs.
To make easier for the user, we provide HyperTerminal script files and Excel macro files. These files only run on Microsoft Windows operating systems. For other operating systems, you may have to find your own suitable ASCII Terminal programs. If you need a program for DOS 4.0, 5.0 or 6.0 please let us know.
When a shot is fired, CE-3 transmits Velocity Data, Timer Data, Temperature Data and Event-Sequence number to the PC. The information is in a data logging format for easy import to any Spread Sheet or Data Base programs. It also allows data to be printed out on any printer.
All events related to data capture and chronograph setup that may affect velocity measurement are given an Index number and an Identifier tag. This information is important for Excel and other Data Base programs because it is used for filtering out non essential information or to keep track of the work history. The Index number starts at 00000 and can go up to 65535. When it reaches 65535, it resets back to 00000. This sequence number is stored in the unit as system information.
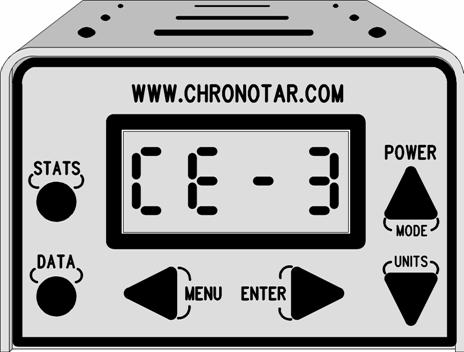
Here is an example of a
typical display with Velocity data, Timer data, Temperature data and Running
Stats. The Running Stats, in this example, are set to monitor the "Extreme Spread" on the last 5 shots.
Velocity is in "f/s", Time is
in "sec" and the Temperature
is in Fahrenheit "fah".
|
1) |
|
Click on the Excel file "eChrony.xls". |
|
2) |
|
Click on the HyperTerminal program "eChrony.ht". |
|
3) |
|
Here it is assumed that your PC has one free COM1 port. If you have an |
|
|
|
older PC, it may be necessary to find a free COM port first. |
|
4) |
|
Plug the interface cable into on the PC and the other end into CE-3. |
|
5) |
|
From within the HyperTerminal window press "Q" or "W" or "Space |
|
|
|
Bar" key. This will wake up the unit and display the following message |
|
|
|
|
|
|
Display shows the Company’s name, Model number (CE3)
and Version (V10).
(eChrony.com) is the engineering company
that designed this product.
(SYS:00501) states that
your next shot will have Index number (00501).
(Att=01:06:03_02) is the last working status before the
unit was turned Off. Last work was at Folder number (01), String number (06) and Shot number (03).
Number (_02) indicates your last data
review position was shot number (02).
(Ready CAP=OFF) indicates that the unit
is ready but the sensors are turned Off. When PC wakes up the unit, it always
goes to CF Mode, first Data Menu location.
There are many ways to
proceed from here. (MEN<DAT> 00?) indicates
that you are in the Data-Menu.
To start CE-3, you may decide to press "D"
key to go into Data mode, followed by "C"
key to calibrate the unit. Display will then show:
|
|
|
|
|
|
CE-3 completed the
calibration successfully and it has decided that the range is fine. There is no
CAP=OFF message because CE-3 turned the sensors on and it is now ready for your
shots. If you do not care about Folders, Strings or Running Stats, then
just start shooting.
You may want to clear current string first by pressing "Alt-Del" key. In this example we pressed
"S" key to go into Stats mode
and then "Down" key three
times to select Running Stats for "Extreme
Spread". After firing 5 shots, the display will show as
follows:
Clear String & Set Stats example
|
|
|
|
|
|
The first shot had index number (CAP:00501)
with velocity of (1801.24 f/s).
The elapsed time between this shot and previous shot was (1844.207*s*). (*s*)
indicates that the clock was turned off since last shot and therefore this
time is not valid. Subsequent times are valid (sec).
The ambient temperature was (93.6 fah).
The extreme spread for string-6, shot-1 (06:01_Es
0.00) was (0.00). If you do
not need temperature and running stats, these can be turned off to reduce the
clutter.
Here is an example:
|
|
|
|
|
|
When display clutter is
reduced, you can magnify the view within the eChrony.ht
screen.
Here is an example with display set to font "Courier
New, Bold, size 40". To reduce display clutter J*Log, K*Log &
L*Log has been turned off with "J", "K"
and "L" keys.
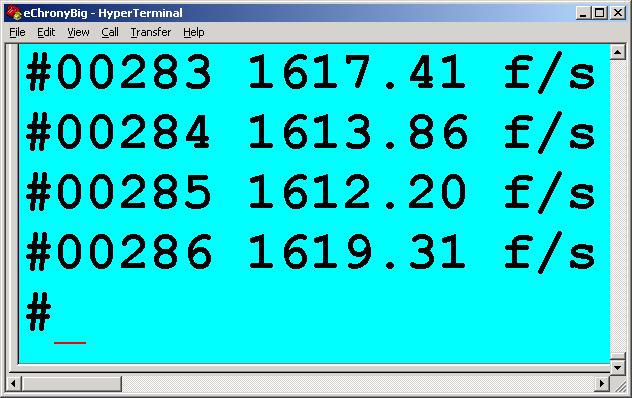
The timer values are not visible because the magnification it too large.
Velocities can be clearly seen from a large distance. Here is an example from
an earlier work session with sequence number 00283.
Example of CE-3 downloading data
When you use CE-3 in the field without PC, all your work is saved in volatile memory. Please note, only CF mode saves data on eDisk whenever the unit is turned off or folders are changed. This data can be downloaded later on to your PC by following these steps:
|
1) |
|
Plug CE-3 into the COM1 port on your PC. |
|
2) |
|
Click on eChrony.ht, the HyperTerminal program |
|
3) |
|
In HyperTerminal program click on "Transfer" |
|
4) |
|
Select "Capture Text" |
|
5) |
|
Choose file name to save your data. |
|
6) |
|
Press "Space Bar" or any key to wake up the unit. |
|
7) |
|
Press "3" to download entire work. |
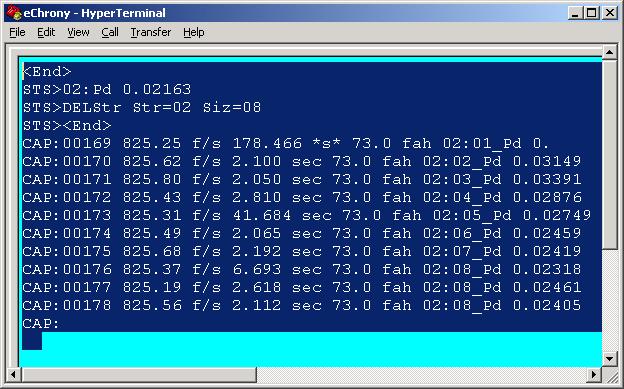
The file contains entire disk; here only a portion is displayed, which belong to the folder number 3. All folders are distinctly identified for Excel import.
|
|
|
|
|
|
|
1) |
|
Open text file created by eChrony.ht |
|
2) |
|
Go to "Edit" |
|
3) |
|
Choose "Select All" |
|
4) |
|
Click on "Copy" |
|
5) |
|
Open file eChrony.xls |
|
6) |
|
Execute macro "Import_MMR_Data" |
All your data is now exported and aligned in the Excel spreadsheet. Data is also sorted to remove any comments etc.
Example of transferred data Windows
CE-3 is controlled from PC
or TTY terminal by pressing a single key. It uses alpha-numeric characters, 0 to 9, A to
Z and control characters Ctrl-A to Ctrl-Z.
Destructive operations use control character to prevent accidental use. These
destructive operations are such as Delete/Undelete
Folder, String etc.
We provide a HyperTerminal script files for Windows 98, XP, ME and 2000
that takes advantage of the Windows keys for easy use. For Windows keys to work
with Hyper Terminal you have to download HyperTerminal upgrade from Microsoft
or from Hilgraeve website.
CE-3 will work with any TTY Terminal or Terminal software that uses RS232 communications. PC or TTY terminal must be setup with the following parameters:
|
Baud Rate: |
|
300 to 4800 |
|
Data Bits: |
|
8 Bits |
|
Parity: |
|
None |
|
Stop Bits: |
|
1, 1-1/2 or 2 |
|
Flow Control: |
|
XOn/XOff, or None |
Note: When Flow Control is
set to None, there may be loss of data if your PC is slow.
CE-3 transmits data as fast as baud rate allows. This requires
flow control for
slow terminals and PC's.
The "TTY Terminal" or the PC "Terminal Software" must permit the use of the following control keys.
|
Crtl-@ |
Ctrl-D |
Ctrl-H |
Ctrl-L |
Ctrl-P |
Ctrl-T |
Ctrl-X |
Ctrl-\ |
|
Crtl-A |
Ctrl-E |
Ctrl-I |
Ctrl-M |
Ctrl-Q |
Ctrl-U |
Ctrl-Y |
Ctrl-] |
|
Ctrl-B |
Ctrl-F |
Ctrl-J |
Ctrl-N |
Ctrl-R |
Ctrl-V |
Ctrl-Z |
Ctrl-^ |
|
Ctrl-C |
Ctrl-G |
Ctrl-K |
Ctrl-O |
Ctrl-S |
Ctrl-W |
Ctrl-[ |
Ctrl-_ |
The control characters in red italic letters may be used by the TTY terminal software for its own use, as well as CE-3 Chronograph. Their functions are as follows,
|
Ctrl-C |
= Stop Program Execution |
Ctrl-Q |
= Xon, Terminal Ready |
|
Ctrl-J |
= New Line |
Ctrl-S |
= Xoff, Terminal Not Ready |
|
Ctrl-L |
= New Page |
Ctrl-Z |
= End of Text file |
|
Ctrl-M |
= Carriage Return |
Ctrl-[ |
= Esc, Stop |
Control keys for CE-3 chronograph
|
TTY |
PC |
Function Description |
|
A |
A |
Archery On/Off |
|
B |
B |
Reserved |
|
C |
C |
Calibrate |
|
D |
D |
Data mode |
|
E |
E |
Reserved |
|
F |
F |
Fast fire On/Off |
|
G |
G |
Reserved |
|
H |
H |
Help |
|
I |
I |
Sensitivity change, 0 to 95% by 5% steps |
|
J |
J |
J*Log, CAP Index Log On/Off |
|
K |
K |
K*Log, Temperature Log On/Off |
|
K |
L |
L*Log, Calculated Value Log On/Off |
|
M |
M |
Menu Mode On |
|
N |
N |
Reserved |
|
O |
O |
Decrease sensitivity, 0 to 95% by 5% steps |
|
P |
P |
Power Off |
|
Q |
Q |
Query system status. |
|
R |
R |
Reserved |
|
S |
S |
Stats Mode On |
|
T |
T |
Data Type select, Velocity or Temperature |
|
U |
U |
Units select, Metric or Imperial |
|
V |
V |
Reserved |
|
W |
W |
Where is Current Record Location, Folder, String, Shot |
|
X |
X |
Reserved |
|
Y |
Y |
Locate Position of Minimum or Maximum in the string |
|
Z |
Z |
Turn sensors Off, reduce power consumption by 50% |
|
TTY |
PC |
Function Description |
|
1 |
1 |
String Download |
|
2 |
2 |
Folder Download |
|
3 |
3 |
eDisk Download, All folders |
|
3 |
9 |
Save data to eDisk and turn the unit Off |
|
Esc |
Esc |
Exit Current Operation |
|
Ctrl-^ |
Del |
Shot Delete |
|
Ctrl-\ |
BSpc |
Shot Undelete |
|
Ctrl-_ |
Alt-Del |
String Delete |
|
Ctrl-] |
Alt-BSpc |
String Undelete |
|
Ctrl-O |
PgUp |
Folder Increment or Menu Value Increment |
|
Ctrl-K |
PgDn |
Folder Decrement or Menu Value Decrement |
|
Ctrl-R |
Right |
String Increment or Move to Next Menu |
|
Ctrl-L |
Left |
String Decrement or Move to Previous Menu |
|
Ctrl-U |
Up |
Scroll Up, Data, Stats or Submenu Up |
|
Ctrl-D |
Down |
Scroll Down, Data, Stats or Submenu Down |
|
Ctrl-M |
Enter |
Enter key, Execute menu, acknowledge alarms |
|
Ctrl-J |
Ctrl-J |
Line Feed |
|
Ctrl-W |
Ctrl-W |
Change String size, select next size |
|
Ctrl-A |
Ctrl-A |
Folder Delete |
|
Ctrl-B |
Ctrl-B |
Folder Undelete |
|
Ctrl-T |
Ctrl-T |
Text Mode On, enter text notes |
|
Ctrl-E |
Ctrl-E |
Select CAM mode, extended functions |
When the unit is first powered on, it displays the following text on the HyperTerminal or TTY screen:
|
|
|
|
|
|
Explanations for the above display
|
SYS: |
|
System status tag |
|
00488 |
|
Serial number for the next shot. |
|
eChrony.com |
|
The company eChrony Inc. that designed this product |
|
(c)2005 |
|
This product’s copyright belongs to eChrony Inc. |
|
CE3: |
|
This product’s model number |
|
V10 |
|
Firmware version number |
|
S143012191105 |
|
Serial number |
|
Att=06:03:07_01 |
|
Data Position, Folder=6, String=3, Shot=7, View Shot=1 |
|
Power On |
|
Power is On |
|
Ready |
|
Unit is Ready |
|
DAT> |
|
You are in Data View mode |
CE-3 Chronograph
can operate in the following modes, which are indicated by the prompt tag as
follows:
|
Prompt Tag |
Description |
Selected by |
Key |
|
DAT> |
Data mode for data viewing. |
User |
"D" |
|
STS> |
Stats mode for stats viewing. |
User |
"S" |
|
MEN<DAT> |
Data Menu mode for data control. |
User |
"M" (*) |
|
MEN<STS> |
Stats Menu mode for setup control. |
User |
"M" (*) |
|
TXT: |
Text mode for entering comments. |
User |
"Ctrl-T" |
|
CAP: |
Data Capture mode, shot detected |
Automatic |
none |
|
SYS: |
System mode, system changes made |
Automatic |
none |
|
CAL: |
Calibration mode, calibration executed |
Automatic |
none |
|
ERR: |
Error mode, when errors occur. |
Automatic |
none |
(*) Key
"M" is active in either Data Mode or Stats Mode.
As most of the
functions are automatic, all the user has to do is to select Data mode, Stats
mode, Menu mode or Text mode.
Detailed Key Command descriptions
Pressing "A" key turns On or Off archery mode. When
archery mode is changed, either turned On or Off, the sensors are turned Off as
indicated by (CAP=OFF).
The unit must be recalibrated again by pressing "C" key.
|
|
|
|
|
|
This command starts
Adaptive Calibration by pressing "C"
key. When completed successfully, with no error message, the unit returns to Data
mode for the shot recording.
If the Calibration failed, the unit returns to Data-Menu mode. If
calibration failure is critical, then sensors are turner off, as indicated by (CAP=OFF). From here it is necessary to proceed
manually.
CE-3 does not have enough intelligence to make a good decision on marginal conditions, so
you have to decide whether to proceed or not. It only recognizes serious
problems and then alerts you with (ERR=Cal) and (CAP=OFF).
|
|
|
|
|
|
This command sets Data mode
On. When "D" key is pressed,
current shot and its location are displayed. In our example below (07:01) indicates String-7, Shot-1, with
velocity (1800.42 ).
Windows scroll keys can be used to move through folders, strings and shots. See
also command "S" Set Stats Mode (page 27)
|
|
|
|
|
|
This command turns Fast fire On or Off when "F" key is pressed. This is not true rapid fire detection. Rapid fire requires far more complex operation than CE-3 can provide right now. Normal mode of operation holds sensors inactive between shots for about 2 seconds, and thus, increases measurement reliability. Fast fire mode holds sensors inactive between shots for 0.7 seconds, which reduces reliability. Our future releases will have a true rapid fire capability.
(Faf=OFF) indicates Fast Fire is Off and (Faf=ON) indicates that it is On.
|
|
|
|
|
|
The "H" key command displays simple help text. Use this command to find your way out of a specific mode. This help resides inside the chronograph; therefore, it has a limited number of lines. You can press "H" any time except when in Text mode. Help screen is available from Data, Stats and Menu modes. Menu mode has help text only for emergency exit information.
Help within Data & Stats mode
|
|
|
|
|
|
Help within Menu mode
|
|
|
|
|
|
"I" Increase sensor sensitivity
This command, "I" key, increases optical sensitivity of the
chronograph. This is generally handled by the CE-3 internal programs; however,
you can override automatic setting by changing this value.
It can be set from 0% (the lowest value) to 95% (the highest value) in
increments of 5%. Please remember that setting sensitivity too high (for
example, 95%), may cause false reading. Default value is 60%.
Before you change this value, please check system status by pressing "Q" key first. You may need to use "O" command
(page 24) which decreases sensitivity.
In the example below, sensitivity it was increased to 65%.
Please note that commands "I"
and "O" turn sensors Off,
and therefore, any change here requires recalibration of the unit. You must
press "C” to calibrate the unit
(which is also the only way to find out if your setting will actually work). The
fine settings, in increments of 1%, are available from Data Menu.
|
|
|
|
|
|
This command toggles J*Log On or Off by pressing “J” key. When J*Log is Off, data is sent to PC without CAPTURE tag, just the sequence number. In the example below, first shot has J*Log On but the second shot has J*Log Off.
|
|
|
|
|
|
"K" Turns temperature Log sent to PC On/Off
This command toggles K*Log On or Off by pressing “K” key. When K*Log is off, temperature data is not sent to PC. In the example below, first shot has K*Log On, second shot has K*Log Off.
|
|
|
|
|
|
"L" Turns Stats Monitor Log sent to PC On/Off
This command toggles L*Log On or Off by pressing “L” key. When L*Log is Off, temperature data is not sent to PC. In the example below, first shot has K*Log on, second shot has L*Log off.
|
|
|
|
|
|
This command, "M" key, takes the user to current menu mode.
When in Stats Mode, it takes user to Stats-Menu. When in Data Mode, it takes
user to Data-Menu.
This is a mirror image of menu key on the CE-3 unit. In Menu mode, PC keys
replace pushbuttons on the unit. Scroll keys navigate trough the menu. “PgUp” is equivalent to <ENTER+UP> and “PgDn”
is equivalent to <ENTER+DOWN>
|
|
|
|
|
|
"O" Decrease Sensor Sensitivity
The command, "O" key, decreases optical sensitivity
of the chronograph.
This is opposite of "I"
command which increases sensor sensitivity. Please refer to "I" command on page 22.
"P" Turns the unit Off without saving
This command turns the unit Off when "P" key is pressed. It can be turned On again by pressing any key. However, when unit is turned On again, it goes into a safe mode with sensors turned Off, and hence, it has to be recalibrated and set to Data Mode to accept shots. There are two ways to recalibrate the unit:
a) The safe way - press "C" to calibrate. When calibration is done,
press "D" to
continue with shooting (i.e., you decide to go ahead).
|
|
DAT><End>
“P” key was pressed here |
|
|
b) Normal mode –
press “D” to go to Data mode and from there
press “C” to
calibrate. In this mode CE-3 will decide for you if the environment is
acceptable
and enable sensors accordingly. Please note: CE-3 has a limited
intelligence and
may not always be right.
|
|
|
|
|
|
This command displays
system status, when "Q" key is
pressed.
It is a good idea to check status of the chronograph before you start shooting.
|
|
|
SYS:00085 eChrony.com (c)2005, CE3:V01S143012191105 SYS:00085 Bat=8.63V Tmp=23.5C PwrDown=ON=00:30 SYS:00085 Faf=OFF Arc=OFF Sens=OFF SLev=50% Cal=00 SYS:00085 K*Log=ON L*Log=ON J*Log=ON Cam=01 SYS:00085 Vel=f/s Tmp=fah Tim=sec SYS:00085 MaxFol=10 MaxStr=03 MaxSho=13 SYS:00085 Att=06:03:05_05 SYS:00085 Ready CAP=OFF DAT> |
|
|
|
|
|
|
|
Bat=8.46V |
|
Battery Power in Volts. |
|
Tmp=23.5C |
|
Ambient temperature in Celsius |
|
PwrDown=ON=00:30 |
|
Automatic power shutdown, enabled, set for 30 min. |
|
Arc=OFF |
|
Archery mode is Off. |
|
Sens=OFF |
|
Sensors are Off |
|
SLev=50% |
|
Sensitivity level set to 50% |
|
Cal=861 |
|
Current calibration setting is 861 |
|
Faf=ON |
|
Fast fire is On. |
|
J*Log=ON |
|
Capture Tag log is On |
|
K*Log=ON |
|
Temperature log is On |
|
L*Log=ON |
|
Running Stats log is On |
|
Vel=f/s |
|
Velocity in feet per second. |
|
Tmp=fah |
|
Temperature in Fahrenheit. |
|
Tim=sec |
|
Time in seconds. |
|
MaxFol=10 |
|
Maximum Folders available - 10 |
|
MaxStr=03 |
|
There are 3 Strings per folder for this folder |
|
MaxSho=13 |
|
Each string has can have 13 shots in this folder |
|
Att=06:03:05_05 |
|
Current location is Folder 06, String 03, Shot 05, review 05 |
|
Ready CAP=OFF |
|
Unit is ready but sensors are turned Off, must calibrate |
This command sets Stats mode. When "S" is pressed, the stats for the current string are displayed. Windows scroll keys can be used to move from stats to stats, from string to string and from folder to folder.
|
|
|
|
|
|
This command, by pressing "T" key, selects data type that Data Mode or Stats mode will display. CE-3 stores only two data types: Velocity and Temperature, and this command simply toggles between these two types.
|
|
|
|
|
|
"U" Change units for selected data type
This command changes units
of a selected data type by pressing "U"
key. Velocity units can be changed from m/s to f/s (or vice versa) and
temperature can be changed from Celsius to Fahrenheit (or vice versa). You
must first select data type in order to be able to change the units.
|
|
|
|
|
|
"W" Display current data location
This
command, “W” key, displays current data
location. It refers to data that is stored in the unit and not on the PC. It is
a good idea to check your present location before you start shooting, so that
you know where your data will be stored. This is all logged on the PC.
|
|
|
|
|
|
|
Att=08:06:05_03 |
|
Location Folder 08, String 06, Shot 05, Reviewed Shot 03 |
|
Fol=08 |
|
Folder number is 8 |
|
Str=06 |
|
String is 6 |
|
Siz=05 |
|
Shot is 5, next shot will be placed in position #7 |
|
Sho=03 |
|
Currently reviewed shot number is 3. |
|
|
|
|
"Y" Locate Min or Max position in the string
This command, by pressing "Y" key, finds the location of current stats, such as Low or High only. You must be in Stats Mode and select "Hi" or "Low" using scroll keys.
|
|
|
|
|
|
(STS>06:Lo 1800.42) indicates
"Low" stats view for String 6.
(STS>06:02 1800.42)
indicates the location of "Low" stats and can be recalled by
"D" command.
(STS>06:Hi 1801.00) indicates
"High" stats view for String 6.
(STS>06:05 1801.00)
indicates the location of "High" stats and can be recalled by
"D" command.
The "Z" key command turns sensors Off. When sensors are Off, battery power consumption is reduced by more then 50%. You may want to turn sensors Off when you are reviewing data or setting up the unit. The unit must be calibrated again with "C" command in order to accept shots again. CE-3 also logs your Setup changes for the current sequence number.
|
|
|
|
|
|
This command downloads current string from memory when “1” key is pressed. This can only be done from Data or Stats mode. Data is downloaded in the units currently selected by "U" command. It is a good idea to turn sensors off with "Z" command when you are reviewing or downloading data.
|
|
|
|
|
|
This command, when “2” key is pressed, downloads the strings from current folder, including empty strings. Data is downloaded in the units currently selected by "U" command. It is a good idea to turn sensors off with "Z" command when you are reviewing or downloading data.
|
|
|
DAT>
"2" key was pressed here |
|
|
This command, “3” key, downloads all the folders present on eDisk, including empty ones. Strings and folder are identified with abbreviated names. If your folders are full you may have to save downloaded data to a text file. HyperTerminal buffer has only room for 500 lines/shots. In the example below we show part of downloaded data:
|
|
|
|
|
|
"9" Turn the unit Off and saves folder
This is similar to “P” command – it turns the unit Off by pressing “9” key. But unlike “P”
command, it saves current folder and your current working status to eDisk, before
the unit is turned Off. When using PC, saving data to eDisk is unnecessary,
because PC has a far better storage capability. Also PC stores more information
then eDisk can. Use this command if you need to save current setup status, such
power down time, sensitivity level, archery mode etc.
This command deletes current folder by pressing "Ctrl-A" keys
"Ctrl-B" Un-delete deleted folder
This command reverses deletion of current folder by pressing “Ctrl-B” keys.
|
|
|
|
|
|
"Ctrl-E" Select CAM test mode
This command, when “Ctrl-E” keys are pressed, is only active from
Data or Stats menu. There are 4 CAM
modes and only CAM1 & CAM2 are documented here. CAM3 and CAM4 are reserved
for service personnel and factory testing. Do not set the unit to CAM3 and
CAM4. If you discover unfamiliar commands and change their values, you must
restore factory settings by pressing <DATA+STATS+MENU>
keys on the unit itself. This resets the unit; but before you do that, save your
data by pressing "9" key
first.
|
|
|
|
|
|
"Ctrl-T" Text & Notes entry mode
This command, by pressing
"Ctrl-T" keys, sets up text
mode. Text mode allows you
to enter notes into the log file.
After pressing "Ctrl-T" you
can enter your text. Pressing "Esc"
key or firing a shot
will terminate this mode.
There is no limit on the amount of text that can be typed while in the text
mode, but because this is a data logging program, you can not edit it.
|
|
|
|
|
|
This command, by pressing
"Ctrl-W" keys, changes string
size.
When string size is changed, the folder is deleted. Use this command with
caution; data recovery is still possible from Data Menu, however data sequence
may be lost.
This command cycles through the possible string sizes - there are 4, 5, 6, 8,
10, 13, 20 and 40 shots per string. There is room for only 40 shots in each
folder; therefore, as you increase string size, you reduce number of strings
available.
When you use PC, number of strings available on CE-3 does not matter because
data logging allows you to store thousands of strings with Sequence ID from
00000 to 65,535.
String size setting is useful for "Running Stats” monitoring. By setting
string size, your load group size, you will be able to see on the PC screen
live stats as you add new shots.
|
|
|
|
|
|
This command, “Esc” key, exits current, non-critical operation, such as "CAP:" or "TXT" mode, etc.
|
|
|
|
|
|
"Enter" Enter key same as <ENTER> key
This command is "Enter" key on PC keyboard and simulates the "Enter" button on the chronograph. In Data and Stats, it will acknowledge alarms, or display current Data or Stats. In menu mode, it displays function value or executes the function.
|
|
|
|
|
|
Pressing "Delete" key deletes current shot. See
example below,where shot is deleted.
"Backspace"
Un-delete deleted shot
By pressing "Backspace" key, you restore last deleted current shot.
|
|
|
|
|
|
"Alt-Delete" Delete current string
This command, “Alt-Delete” keys, deletes current string number. See example below.
"Alt-Backspace" Un-delete deleted string
Press "Alt-Backspace" keys to undo deletion of the string.
|
|
|
|
|
|
"PgUp" Move to the next folder
By pressing "PgUp" key, this command moves to the next
folder, up one number.
Current folder is saved on eDisk before the new one is retrieved.
"PgDn" Move to the previous folder
By pressing "PgDn" key, this command moves to the previous folder, down one number. Current folder is saved on eDisk before the new one is retrieved.
|
|
|
|
|
|
"Right Arrow" Move to the next string
This command, by pressing
"Right Arrow" key, moves
to the next string, up one number.
"Left Arrow" Move to the previous string
This command, by pressing
"Left Arrow" key, moves to the
previous string, down one number.
|
|
|
|
|
|
"Up Arrow" Move to the next shot or stats
This command, by pressing
"Up Arrow" key, moves to
the next shot or stats,
up one number.
"Down Arrow" Move to the previous shot or stats
This command, by pressing
"Down Arrow" key, moves
to the previous shot or stats, down one number.
|
|
|
DAT> |
|
|
Following macros are available to import eChrony Data
|
Macro Name |
Shortcut Key |
What does it do |
|
Import CAP Data |
Ctrl-Shift-C |
Imports Captured data from eChrony.ht |
|
Import MMR Data |
Ctrl-Shift-M |
Imports eDisk Memory from eChrony.ht |
|
Stats Setup |
Ctrl-Shift-S |
Sets Up Stats for a single string. |
|
Clear All Data |
Ctrl-Shift-Z |
Clears MMR_Data, CAP_Data sheets |
Limitations: These formulas occupy a
considerable amount of space in this file. Therefore, if you plan to shoot more
than 500 shots per session, we recommend that you make your own spreadsheet
file and use "Data Import" functions located under <File>
or <Data> menu in Microsoft Excel. All fields are delimited with
space character for easy data importing. Excel will automatically detect data
format. You will also have to save your shots into a text file from within "eChrony.ht" because HyperTerminal has a
buffer for only 525 shots.
A1. OS Independent PC Interface
CE-3 Chronograph will communicate with any equipment that has RS232 port. This makes our unit virtually independent of any Operating System (OS) used. Most Operating Systems have access to some form of TTY terminal emulation; therefore, you can use CE-3 with old DOS machines, Windows 3.XX, Windows 95, Windows 98, Windows 2000, Windows ME, Windows XP, Linux, McIntosh etc. There are some restrictions:
|
1) |
|
Baud rate 300 to 4800 b/s, selectable from the CE-3 key. Default is 4800 b/s. |
|
2) |
|
For higher baud rates, PC must support Software handshaking Xon/Xoff |
|
3) |
|
CE-3 uses only 3-Wire interface, it does not support Hardware handshaking |
|
4) |
|
CE-3 is shipped with standard DB9 interface connector only |
CE-3 can be remotely controlled from the PC, including Power On/Off, without the need for proprietary software. It uses a single key for all operations; that is you press one key only. If you forget the key for a particular function, just press "H" to get Help list. This help comes directly from CE-3; therefore, it is PC independent. For detailed description of all the command keys, click Key Commands.
|
"H" |
|
The help key, displays the list and description of control keys |
|
"C" |
|
Calibrates the unit |
|
"Q" |
|
Displays system status, settings, temperature, battery power etc. |
|
"P" |
|
Turns the unit off |
|
"A" |
|
Turns archery mode On/Off |
|
"Del" |
|
Deletes current shot |
|
"Alt-Del" |
|
Deletes current string. |
|
"1" |
|
Downloads current string |
|
"2" |
|
Downloads current folder |
|
"3" |
|
Downloads entire eDisk, all folders |
|
"9" |
|
Saves current folder to eDisk |
|
"PgUp" |
|
Moves to the next folder |
|
"Right" |
|
Moves to the next string. |
|
"Up" |
|
Moves to the next shot. |
All keys have an equivalent "Ctrl-Key" available for the OS (Operating System) that does not support HyperTerminal emulation. All data for velocities, times, temperature etc. is sent in such format that most Spreadsheets and Data Base programs can easily import. The data can also be printed out directly to a printer. With old DOS machines the data can be "Echoed" to the printers directly.
The unit sends to the PC
all information available as each shot is fired. It sends identifying header,
serial shot number, velocity, time between shots, ambient temperature and
calculated string information, such as current location number or stats. Unless
all this information is needed, it can clutter PC display. With a single key
stroke you can turn some information On or Off.
To get rid of all extra information the unit sends to the PC, we provided 3
keys for this. "J" turns Off
or On Data Capture headers, called “J*Log”.
"K" turns Off or On temperature
data, called “K*Log”, and
"L" turns Off or On
running stats & string location, called “L*Log”.
To make sure that you have access to these commands, press "D" to place the unit in a DATA mode.
J*Log Command - turns Off or On Data Capture headers
|
|
|
|
|
|
K*Log Command - turns Off or On temperature data
|
|
|
|
|
|
L*Log Command - turns Off or On running stats & string location
|
|
|
|
|
|
J, K, L*Log Off example
|
|
|
|
|
|
If "J*Log", "K*Log" and "L*Log" are not turned Off, then the unit sends all available information to the PC. In the example below the unit was setup to display the running average on the last 5 shots. It can easily display the Running Stats on Low, High, Average, STD etc.
|
|
|
|
|
|
When HyperTerminal is used from Windows 95, 98, 2000, ME or XP, it can be set up to view the results from a distance by selecting large font. Below is an example of "HyperTerminal" setup for large text , which is "Courier New, Bold, size 40" (larger font may be used if your screen permits). The chronograph here is set up with "J*Log", "K*Log" and "L*Log" turned Off to reduce display clutter and the example below is real life size. We provide two HyperTerminal files, eChrony.ht for regular view and eChronyBig.ht for magnified view. The settings can be modified to suit your own needs.
Magnified view

In normal view, with small regular font "Currier New Regular 12", you will see all the information at once. The example below shows shot serial number, velocity, time, temperature, string number and running average, or string number and running percent standard deviation. You can turn off some of the displayed data to suit your needs.
Our chronograph uses native HyperTerminal program that is supplied with all Microsoft Windows. HyperTerminal program, eChrony.ht, has a buffer memory for only 500 shots. For more than 500 shots, captured data have to be saved into a text file (even millions of shots per session can be recorded this way). To save your data to a text file, choose "Transfer/Capture Text" and select your destination: "Text File". CE-3 transmits data in an easy format for importing to any spreadsheet or Data Base programs. However, we only provide macros and some spreadsheet programs for Microsoft Excel.
Text file is selected form eChrony.ht
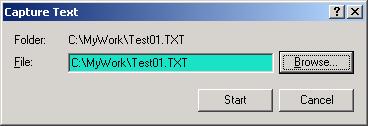
Once the Text file is
selected you can Stop or Pause any time

A7. Import Data to Spreadsheet
Here is an example of
importing a string from eChrony.ht (HyperTerminal
program) to eChrony.xls (Excel
program).
There are many ways to import data to Excel:
1) Import Captured data directly from eChrony.ht with our Excel macros.
2) Import Downloaded data from CE-3 eDisk with our macros.
3) Use Excel data import utility, which will easily detect
our data format.
There are many ways to select data to be imported to your computer. In our case
we have chosen string 02 with block select from HyperTerminal and
pressed “Ctrl-C”.
You can also select an entire file or captured data block from within eChrony.ht. To move these shots to Excel,
click on eChroy.xls and run import
macro - see example below:
Block Select Capture Data
To import eChrony data, just run one of the following macros available in eChrony.xls program:
Excel Macros List
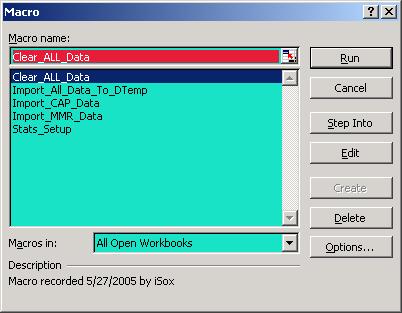
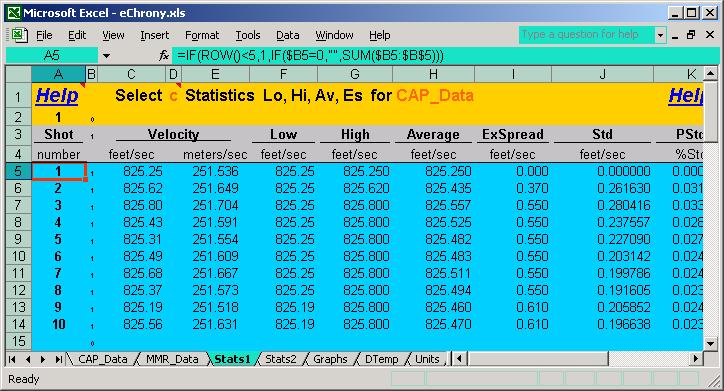
After you execute "Import_CAP_Data", your spreadsheet will contain the data shown below. Please note that eDisk data are imported into "MMR_Data" sheet and Captured data are imported into "CAP_Data" sheet. The stats are available in "Stats1" and "Stats2" sheet. This is an open source Excel file and you can modify formulas and macros to suit your needs. All import data are translated with functions & formulas and not with Microsoft Visual Basic.
Capture Data Sheet
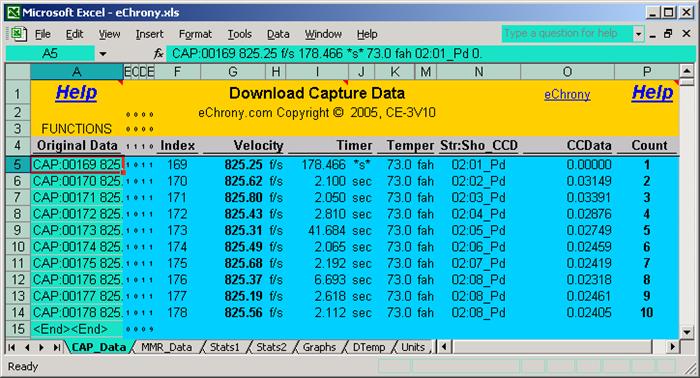
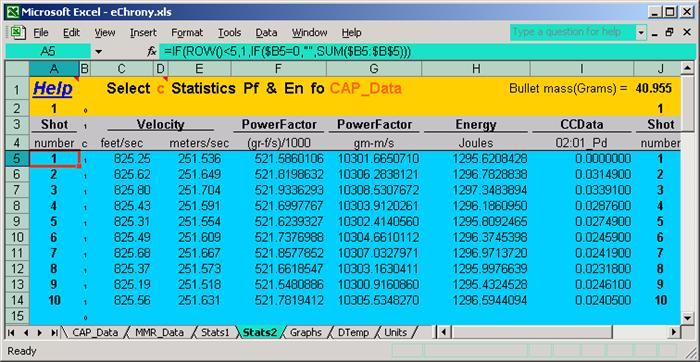
"CCD" shown in the above table is calculated data, which in this case, is the Running %STD on the last 8 shots. If you execute "Stats_Setup" macro, you get stats sheet shown below. We only provide a simple Stats functions in "Stats1" and "Stats2" sheet. You can use them as a working base for your own Spreadsheet calculations.
Stats1 Sheet
Stats2 Sheet
Import data size is limited
to 65,000 shots for Microsoft Excel. Also, when importing large amounts of data
(over 500 shots), you should use Excel data import utility and not our data import
macros. Our macros have been fixed to import data on 500 shots. If you are
familiar with Excel, you can modify our macros to import up to 65,000 shots.
We provide Microsoft Excel program eChrony.xls
and some Excel macros to get you started. In the near future we will
provide a direct link between Excel and eChrony CE-3 chronograph.
Here is an Example of eDisk data import, and, in this case, only a single
string was imported. You can import a single folder or an entire eDisk with all
the folders in it. Again, select a block and press "Ctrl-C" (shortcut keys for copying a
selection):
Block Select String Data

After executing
"Import_MMR_Data" macro from eChrony.xls file, the data are transferred to
the "MMR_Data" sheet shown
below. Please note, that CE-3 does not save Time information on eDisk - it is
only available with Data Capture.
Imported String Data 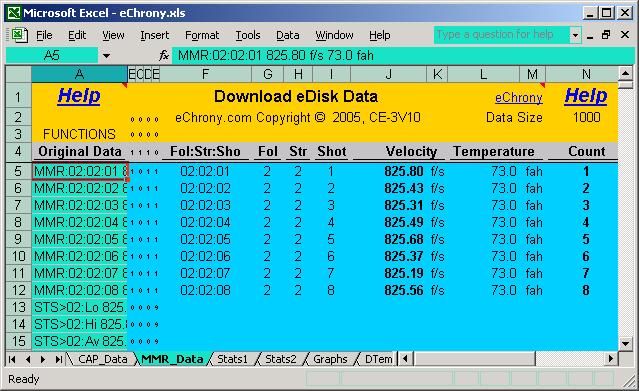
When set to Stats mode, CE3 sends updated statistics of the current string to the PC on every shot. In this example we selected Extreme Spread (“Es”) to be displayed after every shot. The string size selected was 5 shots per string. This way you can see continuous update of "Es" for each of the 5 shots:
|
|
|
SYS:00166 MaxStr=08 MaxSho=05
“Ctrl-W” key used, 5 Shots string size
selected |
|
|
CE-3 provides different ways to run adaptive calibration: remotely from a PC or locally from CE-3 keys. Adaptive calibration runs in automatic mode or in manual mode. Here are some examples:
|
|
|
DAT> “Q” key was pressed to get System Status |
|
|
"Ctrl-W" key is used here to toggle through string sizes. Since each folder can only hold 40 shots, increasing the string size reduces number of strings per folder. Since PC records all shots, therefore string size can be used for defining Stats Monitor during a shooting session.
|
|
|
|
|
|
A11. Archery, Fast fire & Sensitivity
Pressing "A" key toggles Archery mode On or Off. Pressing "F" toggles fast fire On or Off. Pressing "I" key increments sensitivity by 5%. Pressing "O" key decrements sensitivity by 5%. When archery mode or sensitivity is changed, sensors are turned off as indicated by "CAP=OFF". The unit has to be recalibrated again to implement these changes. Calibration will also check your new settings against current environment and let you know if your setting will function in the current environment.
|
|
|
|
|
|
A12. Query Chronograph Status & Setup
When "Q" key is pressed, the unit sends System status and setup information.
|
|
|
|
|
|
Description of the status and settings available: (please also refer to manual’s index)
|
eChrony.com (c)2005 |
|
Company Name & Copyright |
|
CE3:V11S143012191105 |
|
Model CE3, Version V1.1, Serial number S143012191105 |
|
Bat=8.63V |
|
Battery Voltage 8.63 Volts. |
|
Tmp=23.1C |
|
Ambient temperature 23.1 Celsius |
|
PwrDown=ON=00:30 |
|
Automatic Power Down enabled and set for 30 Minutes |
|
Faf=OFF |
|
Fast Fire set to Off |
|
Arc=OFF |
|
Archery set to Off |
|
Sens=OFF |
|
Sensors are Off, shots can not be recorded |
|
SLev=60% |
|
Sensitivity level is 60% |
|
Cal=189 |
|
Last Calibration level was 189 |
|
K*Log=ON |
|
Capture log tag is on,” CAP:” tag will be sent |
|
L*Log=ON |
|
Temperature Log is on, temperature will be sent. |
|
J*Log=ON |
|
Calculated Stats log is on, calculated data will be sent. |
|
Cam=02 |
|
Test mode enabled, full control over CE-3 enabled. |
|
Vel=f/s |
|
Velocity is in Feet/Seconds |
|
Tmp=fah |
|
Temperature in Fahrenheit. |
|
Tim=sec |
|
Time in Seconds. |
|
MaxFol=10 |
|
Maximum number of Folders available |
|
MaxStr=04 |
|
Maximum number of Strings per folders available |
|
MaxSho=10 |
|
Maximum number of Shots per string available |
|
Att=01:02:10_8 |
|
Folder=01, String=2, Total Shots=10, Current Shot=8 |
|
Ready CAP=OFF |
|
Unit ready, Sensors are Off as indicated by “CAP=OFF” |
A13. Download String, Folder or Entire eDisk
Data can be downloaded any time, even during the shooting session; the unit will remember your last position. If your PC can only receive data, you can initiate all downloads from CE-3 keys. This allows you to send downloads directly to a printer with serial port. You may need to lower the baud rate (see CE-3 manual).
String download:
|
|
|
|
|
|
Folder download:
|
|
|
DAT>
“2” key was press here and
current folder was downloaded |
|
|
eDisk download:
This example would look similar to Folder Download except that all folders
are downloaded. CE-3 Version 1.01 has 10 folders and each can have its own
setup.
A14. Move between Shots, Strings & Folders
When HyperTerminal "eChrony.ht" is used, the scroll keys from the PC keyboard move through the eDisk data in a similar manner as in a spreadsheet. In other operating systems, you may have to use "Ctrl-Keys" - see Key Commands for scroll key equivalents.
|
|
|
|
|
|
When "H" key is pressed, an abbreviated list of basic control keys is displayed. This information comes directly from CE-3 and it is independent of operating system of your computer. Because of memory constrains, CE-3 Version 1.01 does not send the list of all the available control keys - you have to refer to this manual for details.
Help within Data or Stats mode
|
|
|
DAT> “H” key was pressed here |
|
|
Help within Menu mode
|
|
|
|
|
|
The unit has full remote control. Pressing "P" key turns the unit Off and pressing any other key turns the unit On. This turns power Off without saving data to eDisk. To save data to eDisk first use “9” command.
|
|
|
|
|
|
”How to Install CE-3 Software” - please refer to page 53
”How to Install Hardware” - please see page 54
Notes-1
Notes-2
All the software below is available from the website
http://www.echrony.com
Media: CE-3 software comes on CD or
a 3-1/2” HD Floppy
3-1/2” floppy is the standard shipment. Visit echrony.com
for downloads
Contents: We supply three files for Windows-95, Windows-98,
Windows-2000,
Windows-ME and Windows-XP. Our software also needs Windows
programs listed below. The upgrade for HyperTerminal is
available from
Microsoft or from http://www.Hilgeave.com and is free of
charge.
· HyperTerminal - must be upgraded to version 6.3 or higher
· Microsoft Excel - 2002 and Up
· Microsoft Access - optional data base use
· Windows 95, 98, 2000, ME,
XP
· eChrony.exe - a self extracting archive
· INSTALL.EXE - a simple installation file
· README.TXT - general text information
Files in the archive eChrony.exe
· eChrony.ht - normal Hyper Terminal script file
· eChronyB.ht - magnified view script file
· eChrony.xls - Excel sample import files with macros
· eChronyH.htm - help file in HTML format
· eChronyH - help file subdirectory
eChrony.htm is a hyper text file and it does not print well. To get a printable version of all the manual and reference cards please visit http://www.echrony.com
Software Installation information
Insert supplied disk in drive A: and type INSTALL. This is a batch file that will perform the following task.
· Goes to drive C:
· Creates subdirectory eChrony
· Goes to created subdirectory eChrony and creates subdirectory CE3.
· Copies file eChrony.exe to subdirectory CE3
· Goes to subdirectory CE3 and unzips all the files in eChrony.exe
· Deletes eCHrony.exe and exits
To access eChrony
programs from Windows go to C:\eChrony subdirectory, point to CE3
and click on it to create a shortcut. Move this shortcut to your Desktop
for easy access. Whenever you click on CE3 shortcut, all our programs
will show up. To run any of them just click on the appropriate program: eChrony.ht,
eChronyBig.ht,
eChrony.xls or eChrony.htm
CE-3 requires a free RS232 port on the PC. We only supply interface cable for DB9 connectors. If your PC has a DB25 connector, then you will need an adaptor to go from DB9 to DB25. DB25 is generally found on old equipment and we do not supply it.
Plug the mini stereo jack into the CE-3 on the right side. Plug the DB9 connector into the PC RS232 free port. If the RS232 port is not free when you run eChrony.ht, it will give you error messages that the port is not available or it is used by some other device. When these errors occur, you must find a free port and change HyperTerminal settings. Do the following
· Go to “Call” menu and click on “Disconnect”
· Go to “File” menu, select “Properties”
· Choose a different port in the “Connected using” list
· Make sure that the selected port is the one hooked up to CE-3
· Click “Ok”
· Go to “Call” menu, click on “Call” menu
· Check the connection by pressing <DATA> key on CE-3 unit
· Current string and velocity should be displayed.
· Now test PC remote control, type “Q” on the keyboard
· CE-3 system status should be displayed on the eChrony.ht window.
You are now ready to continue with your work.
If you have any problems
with connection, get in touch with us at ce@echrony.com and we will try to resolve the
problem as soon as possible.
If you are using older PC with DOS 4.0 and up, you will need some form of TTY terminal software.
If you are using MacIntosh
or Linux, just use the resident TTY terminal software.
At the moment we do not have any “TTY” software for these Operating Systems;
you may have to solve communication problems yourself.
.
INDEX