| Manufacturers Custom Light Fixture |
 |
|
INDOOR LIGHT SETUP Last update - 23/May/2006 |
FLUORESCENT LIGHTS
CE-3 and other optical chronographs
do not work under direct or indirect fluorescent light.
PLEASE NOTE
We are only providing a suggestion on how to make
indoor light fixture
for optical chronograph. We are not responsible for any damages that
may
result from building or using such light fixture. It is your responsibility to
make
sure that it is
safe for you
and others who may use it. You are dealing with
110 volts AC power line,
therefore,
if you are not familiar with the safety
in making such setup, you should then check
with a licensed electrician
and follow his or hers advise.
There are at least six ways to setup indoor light
fixture for an optical chronograph.
Chronographs with poor sensitivity may not work with indirect light setup.
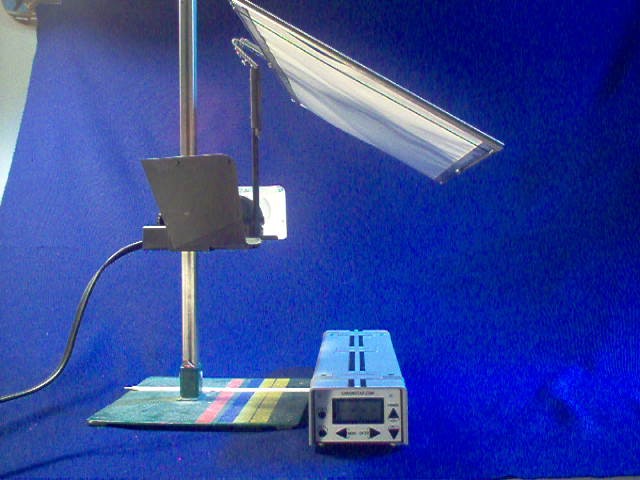
Custom Light Fixture that fits over the chronograph (Direct Light).
Indirect Light reflecting off a White Ceiling.
Indirect Light reflecting off 45-Degree Bristle Board.
Single 60-Watt Light Bulb over normal diffusers (Direct Light).
Two 25 Watt Light Bulbs over normal diffusers (Direct Light).
Red Spectrum for High Accuracy and Repeatability Setup (Direct Light).
Indoor light fixtures sold by most chronograph
manufactures mount directly over
the
chronograph. In general, the fixture is mounted about 12 inches over the optical
slots and is supported by aiming rods. As you
move
the chronograph farther from
the firearm you also increase
the
probability
for
shooting it. This kind of setup
will obstructs your target
view and may
not be
entirely safe.
We recommend that you invest some time and make your own setup, that has
a lower probability of being shot and does not abstract the target. In most
cases,
your own setup will cost less then the manufacturers fixture.
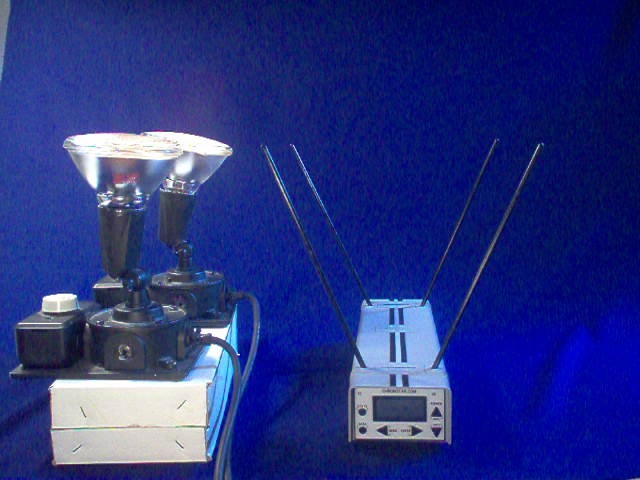
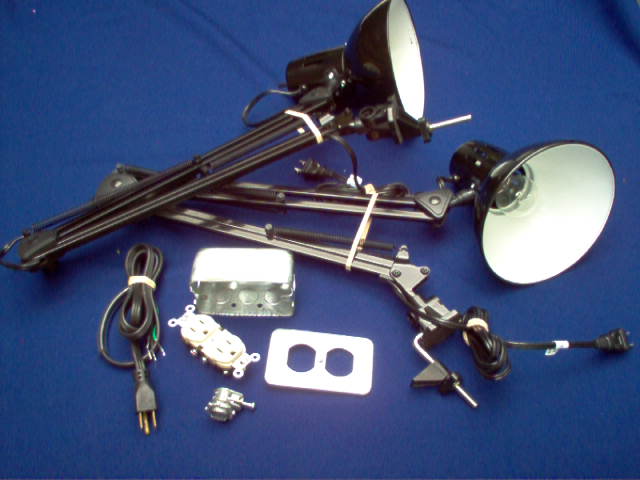
| Manufacturers Custom Light Fixture |
|
|
This is a
typical Indoor Light fixture sold by many chronograph manufactures.
The one on this picture is our Light Fixture, which we do no sell because we
consider it unsafe and easy to shoot. We are planning to introduce a solid
state
light fixture - something that is electrically safe.
| Indirect Light off the White Ceiling |
 |
For this, you need 2 floodlights, with minimum
of 100W each or 75 Watts for halogen
bulbs. These reflectors have to point up, into a white ceiling, so that the bright
spot
is right above the chronograph. The ceiling can not be more than 6 feet from
the chronograph. Also, the ceiling should be very white. If it is not,
staple
a white
bristle board on it, just above the chronograph . This set up will also work with a single
150 watt
floodlight
or a
100 Watts halogen floodlight.
This setup may not be suitable if you have fluorescent lights in the room.
| Indirect Light off White Bristle Board |
 |
A bristle board
is mounted at 30 to 45 Degree angle above the the chronograph.
The distance from the chronograph to the bristle board should be about 2 feet.
This give you plenty of shooting clearance. Two 50-60 Watts reflector
bulbs are
mounted in such way as to illuminate the spot right above the sensors.
You can also use 2 - 100 Watt reflectors connected in series to get
25-Watt.
This is just an example on how to make a light fixture with big
clearance
and unobstructed view of the target.
This fixture is good if you have fluorescent lights in the room.
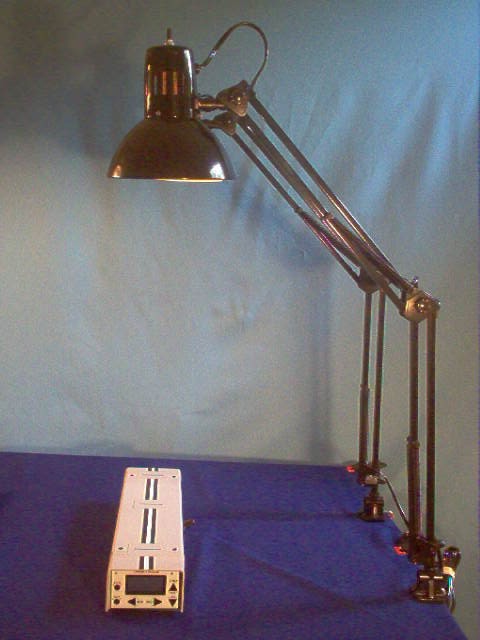
| Single 60-Watt Bulb |
 |
This is one of
the simplest indoor light fixture to make, It is also one of
the cheapest.
You just purchase a $9.00 Desk lamp with a flexible arms and use
a 60 Watt bulb
to illuminate CE-3 Diffusers. Use clear and not
frosted light bulb, frosted light bulbs
have reduced efficiency. The best would be a
halogen
light bulb with 60-Watts
equivalent luminescence. Please note some of desk
lamps allow a maximum
of 60-Watts.
Please note, diffusers supplied by many chronograph manufactures may not work
with this method because you need diffusers that act as a light collectors,
such as
ours.
Move the Lamp so that the bulb is about 2-feet above the chronograph and right
in the center of the two sensors. This places the bulb out of the shooting zone.
Unfortunately you can still shoot diffusers and the aiming rods.
This set up may not be suitable if you have fluorescent
lights in the room
| Two 25-Watt Bulbs with Diffusers |
 |
This is also a
very simple setup that gives you a big clearance for safe shooting.
You need to purchase two $9.00 Desk lamp with a flexible arms. Install 25
Watts
frosted light bulb in each.
Mount lamps on the edge of the table and move the bulbs 2-feet above the
sensors.
With this lighting you can get away without using diffusers, see setup below.
This setup is still
susceptible to external light interference.
This set up may not be suitable if you have fluorescent lights in the room.
| Two 25-Watt Bulbs without Diffusers |
 |
This is the
same setup as above, except you do not need diffusers. For
best results,
use, "Frosted-White-Globe" the big round balls, and
not the ordinary
light bulbs.
With this setup you get
exceptionally large clearance, just make sure
that the each
lamp is right above the optical slot. Use aiming rods to help you
align these lamps.
The bulbs should not exceed 50 Watts.
This set up may not be suitable if you have fluorescent lights in the room.
High Accuracy and Repeatability
Setup
This setup is recommended for serious chronograph work. It provides
reddish light, suitable for high accuracy work. You also get repeatable
result.
| Items that you need to purchase |
 |
Parts that you will need
This setup
requires that two incandescent lights be connected in series. Series
connection means that individual bulb runs on 110/2=55 Volts. This generates
reddish light (red spectrum), this is where sensors have higher sensitivity. Also,
lack
of
bright light
reduces
glare. When these lights
are
connected in series,
the power consumed is reduce to 1/4 of its original
value.
The actual luminescence
is reduce even further. The life span of
these
bulbs probably increases by a factor
of 10 or more.
Here is the list of all the item that you will need to purchase,
2 - Desk Lamps, made of metal and painted black.
Lamp Shade must be 7 Inches in diameter
(+/-1 inch).
Some, "Made in China", lamps require fixing -
screws must be added
to prevent Shades from falling. Drill a tiny hole where the indentations are
and drive short screws into these holes.
6 - Foot Extension with Ground wire and a Plug with Ground prong.
1
- Receptacle with ground.
Make sure it has a circuit-isolation
brake-off strip, see picture below.
Most receptacles come with this option - even the cheapest once.
1 - Duplex Receptacle Cover (Metal).
1 - Electrical Box - Surface mount type (Metal).
1 - Cable Connector - Strait (Metal). The type used for Romex wire.
2 - Light bulbs (appliance type), 60-Watts small size, clear not frosted.
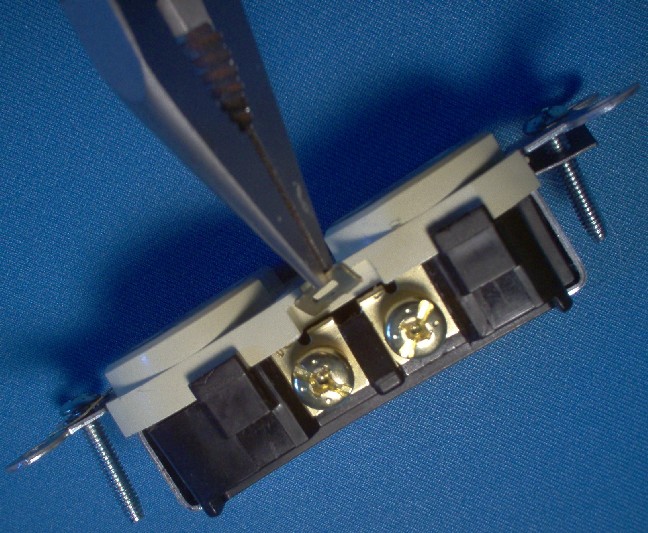
Here is the suggested method of making a series-connected receptacle.
Receptacles come with an option whereby you can isolate circuits on each side.
There is a tiny metal strip on each side that can be
broken off.
You only brake off
one, it is the one on the "Hot" wire side (the side where
receptacle
hole is the shortest).
This is on the apposite side of where the ground screw
is. Use a pair
of needle-nose
pliers to brake off the metal strip. Brake this strip as shown below.
| Receptacle Circuit Isolation Brake Away |
 |
Assemble all
the parts and connect as shown below. Do not forget to
connect
the ground wire to the receptacle. Both the neutral and hot wire of the
plug & cable
assembly are connected where you broke off the metal strip.
Do not forget to install
Connector and thread the cable through it, before you
connect the wires. To make
the assembly durable, you should get a 3" piece of
rubber hose and use it as a strain
relief for the cable. The pliers show you
where
you broke off the metal strip. Do not
connect anything to the other side,
"The Neutral", just tightened those unused screws.
If you are
using cable with
stranded copper wire, then you have to twist the strands
together and fill it
with solder, This will prevent fraying and possible crossover shorts.
The green wire, as shown below, is the ground wire that you must connect to
ground screw.
| Connection and Parts Essabley |
 |
Once done, have your a licensed electrician examine your work. If your
electrician
approves of your work than screw receptacle into the box and cover it with
the
receptacle cover. Your final result should look, more or less, like the picture
below.
DO NOT USE
THIS FOR ANY OTHER APPLIANCE
EXCEPT FOR YOUR CHRONOGRAPH LIGHT FIXTURE.
| Final Serial-Connection Recepticle |
 |
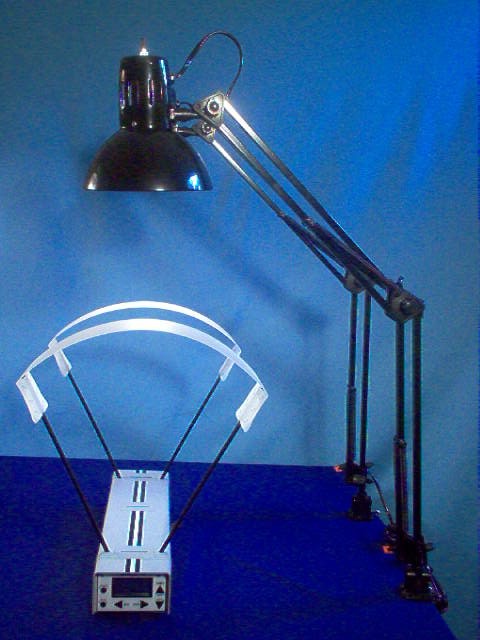
Now you are
ready to setup light fixture. With some models we ship a "Special
Indoor Light Diffusers" for such light fixture. These diffusers require that
the lamp
shade
is 7 inches in diameter (+/- 1 Inch). These diffusers shield the chronograph
from
the fluorescent lights and disperse the light evenly over the sensors. The
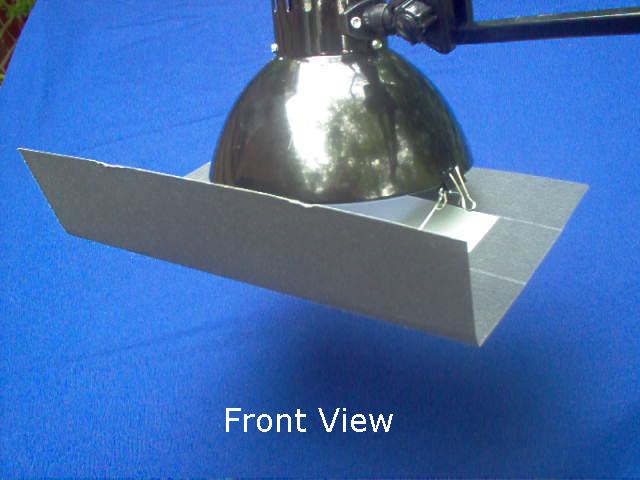
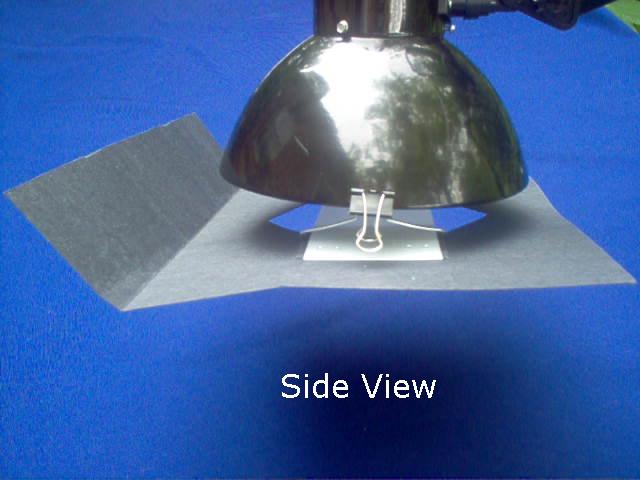
gaping holes on both sides of the white material are necessary for ventilation. Here is
picture
of
the two diffusers, one packed and one unfolded,
| Special Indoor Light Diffusers |
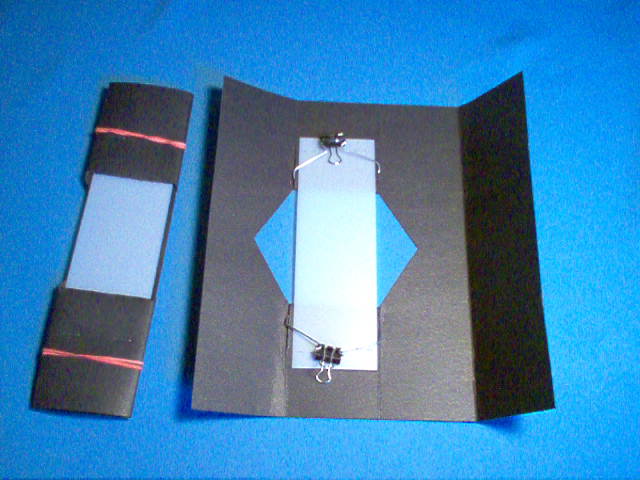 |
This diffuser
assembly is made of Paper & Plastic and it mounts 3 inches from
the bulb. "Do Not Use" bulbs that generate more then 30 Watts of power
per
Lamp Shade. With a Serial-Connection Receptacle, you must make sure that
both lamps have "Identical Bulbs". With identical bulbs the power of
each bulb
is reduced by a factor of 4, a 60 Watt bulb will generate 15 Watts
power.
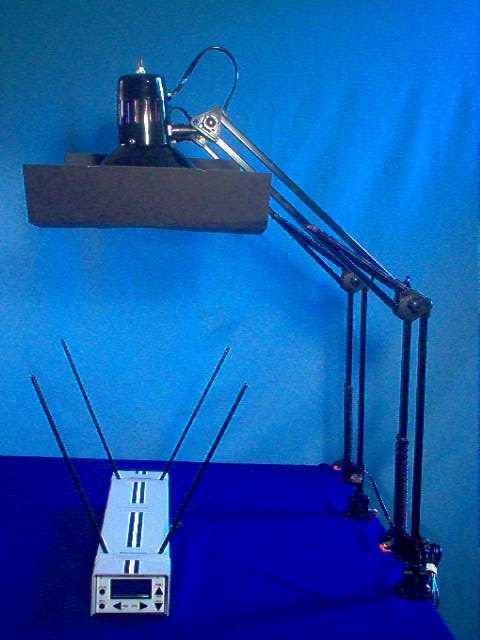
Setup your fixture as show below, use aiming rods to help you
align these lamps,
they must be right over the optical slots. Move the lamps
18-inches above the sensors.
If you move lamps higher then 18-inches, you will
then have to extend the black paper
to increase fluorescent lights shield.
| Fianal Setup |
 |
Use a piece of
wood or tape to mark where the chronograph sits. You need
to consistently place the chronograph on the same spot. After it is setup, you
no longer need aiming rods. The Indoor Diffusers have fold up edge that need
to be folded Up. These flaps block any light shining back at your
aiming
sights.
| Indoor Light Diffusers - Front View |
 |
| Indoor Light Diffusers - Back View |
 |
| Indoor Light Diffusers - Side View |
 |
Please note:
- For consistent, accurate and repeatable results, it is very important
that you align each the bulb in the center of the optical slot.
- Both On/Off switches on the Lamps must be turned On.
Any one of the two Lamp's On/Off switches can be used
to
turn off both lamps.
If you need
more information on indoor setup please do not hesitate to contact us
at ce@echrony.com
or click here - Contact Us
| eChrony.com(TM) Copyright © 2005 - eChrony inc. |